I wanted to take some time off from the ‘upgrade hell’ that I’ve been putting myself through. So, I got serious and finished a project that has been in the conception form in my head only. I wanted to get the server’s vnc server able to be connected to by a ‘java-aware’ browser.
I decided to do this because some firewalls/antivirus protection suites tend to block traditional VNC as a ‘security risk’. Hogwash as long as the admin properly sets it up. So, this method will circumvent being blocked from running a vnc client like that. However, the server needs a few things running on it in order to do this: tigervnc-server-applet (since the server runs tigervnc), tinyvnc java viewer, and the jdk and jre from oracle. (Java developer’s kit and Java run-time environment) Here’s how to do it:
First, you need to install the jdk and jre. Go to this page and download both files after you accept the agreement. Java. You install it on Fedora with the following commands, as the root user.
## Install Java on 32-Bit OS ##
# rpm -Uvh jdk-7u25-linux-i586.rpm
# rpm -Uvh jre-7u25-linux-i586.rpm
## Install Java on 64-Bit OS ##
# rpm -Uvh jdk-7u25-linux-x64.rpm
# rpm -Uvh jre-7u25-linux-x64.rpm
Verify that it’s running with the following two commands, and you should receive similar output:
# java -version
java version “1.7.0_45”
OpenJDK Runtime Environment (fedora-2.4.3.0.fc18-i386 u45-b15)
OpenJDK Client VM (build 24.45-b08, mixed mode, sharing)
# javac -version
javac 1.8.0_20
I also installed the server applet for tigervnc using the following:
# yum install tigervnc-server-applet
Go to Apache web root directory (i.e. /var/www/html), create a empty directory “vncweb“. Use “wget” to download the files inside the folder. Extract the files using unzip command and rename viewer-applet-example.html file to index.html as shown. (You must be root user.)
# cd /var/www/html
# mkdir vncweb
# cd vncweb
# wget http://www.tightvnc.com/download/2.7.2/tvnjviewer-2.7.2-bin.zip
# unzip tvnjviewer-2.7.2-bin.zip
# mv viewer-applet-example.html index.html
Open index.html file using any editor or nano editor as suggested.
# nano index.html
Next define IP address of Server, VNC Port Number and Password of VNC User that you want to connect. For example, my server IP address is “172.16.25.126 “5901” and Password as “123” for my VNC user called “fakeuser“.
<param name=”Host” value=”172.16.25.126” /> <!– Host to connect. –>
<param name=”Port” value=”5901” /> <!– Port number to connect. –>
<!–param name=”Password” value=”” /–> <!– Password to the server. –>
*** Important *** Leave the Password value EMPTY, or it poses a security issue, unless the vncweb directory is password protected.
Access VNC Desktop of user “fakeuser” from the browser by going to: http://172.16.25.126/vncweb/
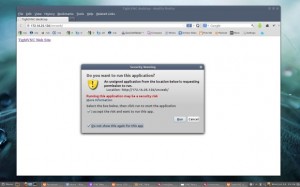
You will get a “Security Warning” message says that unsigned application requesting permission to run. Just accept and run the application as described below.
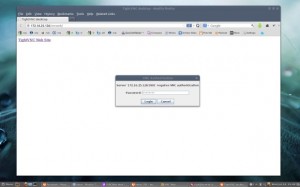
Enter Password to access “fakeuser” vnc server.
You will then be asked for your user password that tigervnc is running under in order to unlock the fakeuser’s desktop.
That’s it, you successfully connected to Remote Desktop.
If you’re accessing from any other computer, you might get an “missing plugin” error, just install plugin and access it. You can grab the latest Java plugin at Download Java page.


