Over the past few months, there have been a variety of issues plaguing my server(s) and network. These problems have come and gone, making arriving at a solution very difficult.
I have a fairly unique networking setup, utilizing a main router flashed with an open source firmware. This router is wireless bridged to another similar router, extending the wireless umbrella’s range. The bridged router only handles wireless duties, and operates as a print server. All of the servers are directly connected to the main router.
Initially, it seemed as there were dns issues, that I thought were entirely Frontier’s fault. They seemed that they were, a few service calls were placed, and they eventually found a bad wire out at the pole. Things seemed to get a bit better, but they were still tweaky.
I tried a variety of things: reflashed and reconfigured the router, replaced the router with the backup router, even replaced the power brick. The router was found to be running under extreme load, somewhere around 1.5 or so, with 4096 Active IP connections (100% — maxed out).
So, I rolled my sleeves up, started by enabling the built in firewall in the router, moving the main server out of the DMZ, and port forwarded required ports to it. This all allowed me the ability to actually start checking the router’s configuration, but it would still periodically overheat and reboot on its own.
So, then, I was able to manage to get ssh enabled in the router, and connected to it via putty ssh client, so as to ease the webgui load… Using the netstat command, I noticed an absolute flood of connections from one of the ancillary servers.
I tracked it down to a bit of malware that somehow got on one of the servers. (No idea how, as I don’t surf the internet from there, or collect email.) All I can imagine is that on one of the rare occasions that I ran a web browser there, I clicked on an infected link. What was going on was a piece of malware called cron64/tsm. It sets up house in .bashtemp and .X19-unix directories, so as to pass casual scrutiny. So, I cleaned everything, and the router is behaving much nicer now, as the router has been online for just about 48 hours WITHOUT a spontaneous reboot. 😉

The router’s load average is running around .15 now, occasionally going up to about .45. The Active IP connections have dropped from the maxed out 4096 to around 200. Things are back to working as they should be.
Now, what is cron64/tsm? It’s a bitcoin miner. They are fairly easy to get infected with, so I should take this time to spread the word….
BitCoins and crypto currency – these are the talk of the town. In December 2017, the value of a single BitCoin crossed $19,000 to nearly touch $20,000. It had been steadily increasing and analysts are comparing the Bitcoin run to the dot-com bubble of the late 1990s. This has induced cyber criminals to find out ways to surreptitiously steal/mine Bitcoins, and miner viruses are one such tool.
Bitcoins are created as a reward for a process known as mining. Bitcoin is a cryptocurrency and used as a worldwide payment system. The anonymity associated with the cryptocurrency has led to it being used for criminal, fraudulent and illegal activities. It is widely used in dark web transactions, drug trade, etc…,
Though predominantly used for nefarious activities, Bitcoins are being accepted by certain businesses and organizations for products, and services and can also be exchanged for other currencies, though to a limited extent.
BitCoin mining is a record-keeping service that is done using computer processing power. Bitcoin transactions are recorded in blockchains, which functions as a public ledger. The consistentency and completeness of the blockchain is maintained in an unalterable state by miners, who repeatedly verify and collect newly broadcast transactions – this is called as a block. Cyber criminals infect vulnerable computers with BitCoin Miner Virus to steal computer processing power. This drastically affects the performance of the system. Hence, users must be able to detect and remove BitCoin Miner virus.
Symptoms of BitCoin Miner Virus:
Overusage of CPU and GPU
Overheating of system
Drastic slowing down of system
Sustained mining could break your PCs hardware.
How is the BitCoin Miner Malware Spread
The BitCoin miner malware are spread through numerous methods, such as email attachments, and embedded in compromised websites. This malware is also found embedded in Trojan Horse viruses. It has also been spread across Windows networks by exploiting the EternalBlue vulnerability.
How to Detect BitCoin Miner Virus
It is very difficult to detect the BitCoin Miner Virus as it is a fileless malware. Traditional antivirus solutions, and most modern virus protection software are NOT capable of detecting fileless malware. You may attempt manual removal, however, it requires considerable technical skill as you have to interact with registry entries such as ActiveScriptEventConsumer, EventFilter, IntervalTimerInstruction, AbsoluteTimerInstruction, and FilterToConsumerBinding. This is quite complicated and sensitive, and incorrect handling could brick your system.
Antivirus and Virus Protection Software
An efficient Antivirus solution that can detect and block fileless malware is what you need. Traditional solutions detect malware based on virus definitions, and hence they cannot detect fileless malware. The Comodo Antivirus which is a part of Comodo Internet Security and Comodo Advanced Protection solutions provides protection against all types of malware including fileless malware such as BitCoin Miner Virus. Comodo Antivirus provides cloud-based resilient default deny protection to block all unknown files including zero-day malware. All unknown files are automatically contained in a sophisticated virtual container where they are allowed to execute and their behavior is observed. This container combines a virtualization of COM interfaces, Disk, Registry, and Memory. The unknown file believes that it is making changes to the real environment, however, it is making changes only to the virtual system. The behavior of the file helps decide if the file is good or malicious.
This virtual containerization, which is unique to Comodo, is the only antivirus solution that can detect and remove the BitCoin Miner Virus.
The moral of this story is that if you aren’t using Comodo Internet Security, you should be. It’s available for Windows, Mac and Linux…. And, it’s free.

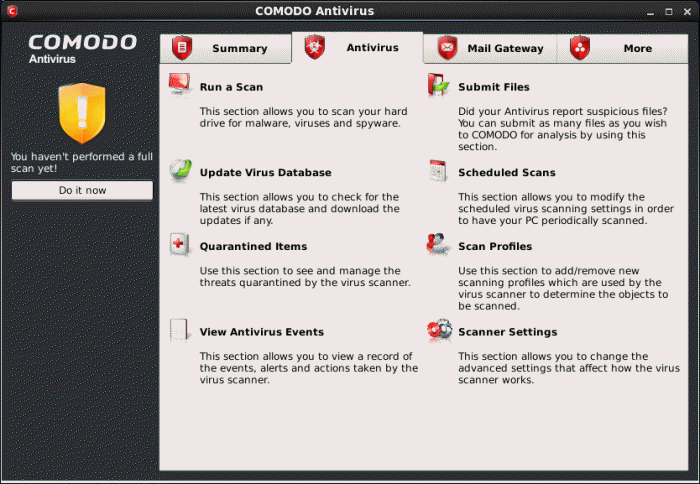 it’s 32 or 64 bit, and download it…. You will see from the image at the right, that it bears a striking resemblance to its windows cousin. In my case, since I use Fedora, I received an .rpm file (stands for redhat package management). Installation was a snap using the terminal shell, and after a reboot, it showed up in the menu of my Mate desktop manager. 😉 However, there was a
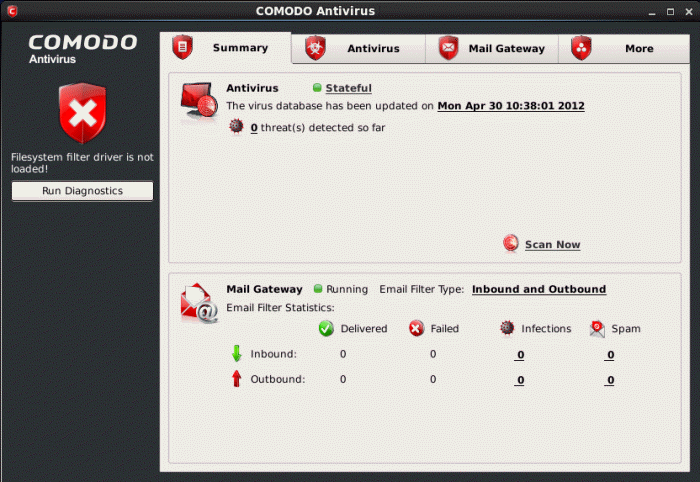 fly in the ointment. After the RPM installed successfully, I was told to run /opt/COMODO/post_setup.sh as root (or sudo). However, it failed building the filesystem filter driver, as seen on the left. Without that, there will be no ‘real time’ virus protection, which kind of is the whole reason for running an antivirus package in the first place, doesn’t it? Well, I have the solution for y’all right here. All you need to do is to download this replacement file: cav_kernel4.1_driver and replace the defective driver.tar file in /opt/COMODO/ (or where ever your distribution puts the main directory). This replacement is for kernel 4.1 or less…. Then, you can rerun the post_setup.sh and it should build the filesystem filter driver properly. 😉