Category Archives: Computer – Linux

This morning, I noticed that Fedora 20 doesn’t have an MTA installed as default.

One of the last things I had to do after imaging the system OS drive with Clonezilla, was to start a fresh backup with dar.  So, I manually started my custom script around midnight, and let it run.  When I woke up, I checked my email, and there wasn’t a backup email.  Curious.  So, I checked if it was still running.  Nope, was finished, but it choked and halted at the point of sending the email.

So, I discovered that there was no Mail Transport Agent installed, so HOW could the command ‘mail’ send any mail?  😉  So, using yum, I installed postfix.  Then, went through /etc/postfix/main.cf and using nano  (as root user) added a few basic things like hostname and domain.  I don’t think that there was much anything else that I had to edit.  So, time to start postfix.

# service postfix restart

The line in my backup script still refused to send out mail.  So, discovered that for some reason, postfix didn’t like my use of -a (attachment).  Had to change the line around like this:

mail -s Auto_Backup_SYS -a /mnt/storage/backupsys.txt -c >/dev/null

mail -s Auto_Backup_SYS -c < /mnt/storage/backupsys.txt >/dev/null

No big deal, since the status file is a text file, but I really don’t know why the -a flag was a show stopper.  While I was at it, I fixed a couple more vhosts for my friend, Don Landes.  Mental note – I really need to clean up the vhosts conf directory, as there are a few in there that aren’t used any longer.  That also means removing the ‘includes’ from the /etc/httpd/conf/httpd.conf file, but that can wait for another day.  😉

Fixing Yumex and Installing Mate GDM.

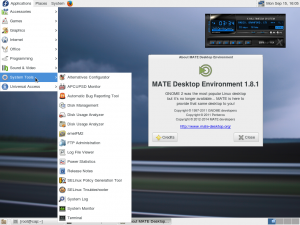
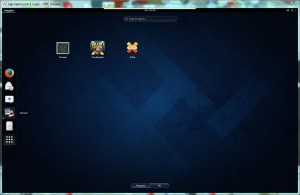
Well, it was bound to happen.  I have been using Linux since 1997 or so, starting with Redhat 4.2.  Back in those days, getting all hardware recognized was quite some feat, and you had to REALLY learn the ‘true’ power of Linux, residing in the Terminal shell.  I remember being quite ecstatic when Gnome 1.0 came out in 1999.  I think I first used it on one of the Redhat 6.x releases.  I have been using it as a GDM ever since, except for trying out a few other ones, like Sawfish.  Well, the love afair is tragically over.  It’s really gone over the edge with Gnome 3.Mate gdm - Fedora 20  So, at the server’s keyboard, I am running Gnome Classic.  (It comes installed by default, so I guess Fedora figured out that some people would really want Gnome2 again.)  Over VNC, I installed Mate GDM, which actually IS the Gnome2 fork.  You can see the menus are very similar, etc.  Here, you see it playing an mp3 stream.  (If anybody needs help on enabling mp3 support in Fedora, just ask.)  To install Mate GDM (as root user):

# yum install mate-desktop

That is only half of the fight, though.  Need to enable it in VNC, so, as root user:

# nano /home//.vnc/xstartup

I would recommend copying the original file somewhere first, just to be safe.  Then, you can edit it and make it just like this:That should do it.

#!/bin/sh

#
# Uncomment the following two lines for normal desktop:
# unset SESSION_MANAGER
unset DBUS_SESSION_BUS_ADDRESS
# exec /etc/X11/xinit/xinitrc
#
[ -x /etc/vnc/xstartup ] && exec /etc/vnc/xstartup
[ -r $HOME/.Xresources ] && xrdb $HOME/.Xresources
xsetroot -solid grey
vncconfig -iconic &
x-terminal-emulator -geometry 80×24+10+10 -ls -title “$VNCDESKTOP Desktop” &
mate-session &

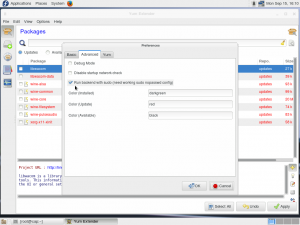
Next, was an issue that reared its ugly head with Fedora 18, and I was hoping that it would be fixed by 20.  No such luck.  Yumex would run over VNC, however, the backend would fail polkit authorization when you tried using it to install/upgrade/remove packages.  This resolved THAT issue:  As you see by the screenshot, you have to run Yumex, and select: Run backend with sudo under the Advanced tab.

Yum Preferences
Yum Preferences

Then, close Yumex.  Next, I had to add a line to the /etc/sudoers file. (Become root user) and use nano to add the following line to the end of the file:

username ALL=SOFTWARE, NOPASSWD: /usr/share/yumex/backend-launcher.py

Runs just fine, now.  😉

There was also a tiny, little problem with Mate.  The Preferences like themes, etc wouldn’t save.  This was because the file mate-settings-daemon did not get installed, but, you should be able to handle this one, eh?


CRAB server now updated to Fedora 20.

Fedora20CaptureWell, I did it!  About 10 days after I started with the F13 server, it is now happily sitting at F20. I knew that this last jump F18>20 would be a fun one indeed, since Fedora has decided to abandon mysql in favor of mariadb.  No idea what their issues are, but that means that quite a few applications on the server that want mysql would fail, for example, the blogs.  This change happened in Fedora 19.  Another change that happened is that F18 and above no longer support anaconda upgrades as has been the practice up to this point.  So, I had to approach this one logically.  First step, was to backup all the mysql databases to one of the storage drives.   Just in case….. 😉

$ mysqldump -u username -p[password] -all-databases > file.sql

Next step was to make sure that I had the latest fedup (Fedora Upgrade), since version .7 was buggy.  So, I used yum (as root user) to grab version .8.

# yum install fedup

Finally, it was time to start the upgrade process.  the way it works is that fedup downloads all the packages and the dracut image, and then tells you to reboot where it actually upgrades.

# fedup-cli --network 20 --nogpgcheck

I used fedup-cli rather than fedup because I was using a ssh session, and wasn't actually AT the server.  ;)

After a reboot, I was left with a Fedora 20 Desktop environment.  So, I looked things over, and as expected the blogs were dead due to mysqld no longer being installed.  I also noticed that the ices streamer was dead as well.  Those seemed to be the only casualties, so I set off to work on them.  First up was the mysql problem.  Way to fix that would be to remove mariadb and install community-mysql. (As root user):

# yum remove mariadb mariadb-libs mariadb-server
# yum install community-mysql-server community-mysql-libs community-mysql akonadi-mysql qt-mysql
# systemctl enable mysqld
# service mysqld start

I checked the blogs, and looks like I don't need my sqldump, as all the data was there.  Next on the list was the ices stream.  I checked to make sure libshout as well as libshout-devel were still installed, and they were.  So, figured it probably needed to be recompiled.  Remember?  We had to do this before....  Trouble with ./configure, though.  It XML was listed as No.  That isn't going to work, so I got out a big hammer..... (As root user):

# yum install libshout libshout-devel libogg-devel libvorbis-devel libtheora libtheora-devel libspeex libspeex-devel lame lame-devel toolame twolame twolame-devel libxml2 libxml2-devel faad2 faad2-devel flac flac-devel curl-devel libxslt-devel libgcrypt-devel libgpg-error-devel libidn-devel

When I ran ./configure again and then make, it failed with flac errors, and since I don't stream flac files, I removed those two like this.

# yum remove flac flac-devel

Now, ./configure again, and then make again, and it compiled fine.  So, I became root user and did make install.  This installs the binary by default as /usr/local/bin/ices.  My setup needs it in /usr/local/icecast/bin/ices.  I've always kept it in both places for standardization.  But, I'm getting tired of always having to copy it there, so I created a symbolic link like so... (As root user):

# ln -s /usr/local/bin/ices /usr/local/icecast/bin/ices

Started the stream and verified it was running, and that is that.  Last tasks are to image the system drive for the last time and update the system using yumex.  :D

VNC over java applet added to the server.

I wanted to take some time off from the ‘upgrade hell’ that I’ve been putting myself through.  So, I got serious and finished a project that has been in the conception form in my head only.  I wanted to get the server’s vnc server able to be connected to by a ‘java-aware’ browser.

I decided to do this because some firewalls/antivirus protection suites tend to block traditional VNC as a ‘security risk’.  Hogwash as long as the admin properly sets it up.  So, this method will circumvent being blocked from running a vnc client like that.  However, the server needs a few things running on it in order to do this: tigervnc-server-applet (since the server runs tigervnc), tinyvnc java viewer, and the jdk and jre from oracle. (Java developer’s kit and Java run-time environment)  Here’s how to do it:

First, you need to install the jdk and jre.  Go to this page and download both files after you accept the agreement.  Java.  You install it on Fedora with the following commands, as the root user.

## Install Java on 32-Bit OS ##
# rpm -Uvh jdk-7u25-linux-i586.rpm
# rpm -Uvh jre-7u25-linux-i586.rpm

## Install Java on 64-Bit OS ##
# rpm -Uvh jdk-7u25-linux-x64.rpm
# rpm -Uvh jre-7u25-linux-x64.rpm

Verify that it’s running with the following two commands, and you should receive similar output:

# java -version
java version “1.7.0_45”
OpenJDK Runtime Environment (fedora-2.4.3.0.fc18-i386 u45-b15)
OpenJDK Client VM (build 24.45-b08, mixed mode, sharing)
# javac -version
javac 1.8.0_20

I also installed the server applet for tigervnc using the following:

# yum install tigervnc-server-applet

Go to Apache web root directory (i.e. /var/www/html), create a empty directory “vncweb“. Use “wget” to download the files inside the folder. Extract the files using unzip command and rename viewer-applet-example.html file to index.html as shown. (You must be root user.)

# cd /var/www/html
# mkdir vncweb
# cd vncweb
# wget http://www.tightvnc.com/download/2.7.2/tvnjviewer-2.7.2-bin.zip
# unzip tvnjviewer-2.7.2-bin.zip
# mv viewer-applet-example.html index.html

Open index.html file using any editor or nano editor as suggested.

# nano index.html

Next define IP address of Server, VNC Port Number and Password of VNC User that you want to connect. For example, my server IP address is “172.16.25.1265901” and Password as “123” for my VNC user called “fakeuser“.

<param name=”Host” value=”172.16.25.126” /> <!– Host to connect. –>
<param name=”Port” value=”5901” /> <!– Port number to connect. –>
<!–param name=”Password” value=”” /–> <!– Password to the server. –>

*** Important *** Leave the Password value EMPTY, or it poses a security issue, unless the vncweb directory is password protected.

Access VNC Desktop of user “fakeuser” from the browser by going to:  http://172.16.25.126/vncweb/

You will get a “Security Warning” message says that unsigned application requesting permission to run. Just accept and run the application as described below.

VNCWeb-2-620x387

Enter Password to access “fakeuser” vnc server.

VNCWeb-3-620x387

You will then be asked for your user password that tigervnc is running under in order to unlock the fakeuser’s desktop.

That’s it, you successfully connected to Remote Desktop.

VNCWeb-5-620x387


If you’re accessing from any other computer, you might get an “missing plugin” error, just install plugin and access it. You can grab the latest Java plugin at Download Java page.