
First, let me say that towards the bottom of this post, you will find some screenshots and links that you will need.
Well, you may or may not know about Microsoft pulling support from Windows 10 on 14 October 2025, making it EOL. Well, Microsoft has put requirements in Windows 11 possibly rendering your desktop PC or laptop into a boat anchor. There are basically four choices moving forward:
1. You can do nothing, and continue using your computer as usual after it goes EOL. (Bad choice, as it will no longer receive security updates making it more and more susceptible as time goes on.)
2. You have the option to pay for the ability to receive security updates for Windows 10. (Another bad choice in my opinion, because Microsoft will cease your ability to pay for updates in three years, at which time, you will only have three possible choices, basically putting you right back where you were.)
3. Buy a new desktop PC or laptop. (Another bad choice, I think, as not many people will have $1000 just laying around to buy a new computer with. So, I think the majority of people won’t like this choice.)
4. Switch operating systems. You could go Mac OS, but would need to buy an expensive Mac, so see the third choice. But there is an operating system that ‘feels’ like Windows, but is free: Zorin OS 17. (I think this is the only real choice if you don’t want to replace your perfectly fine computer or laptop, and toss your present one into a land fill.)
For the course of this talk, I chose one of my fifteen year old laptops (from 2010), an HP Elitebook 8540p. 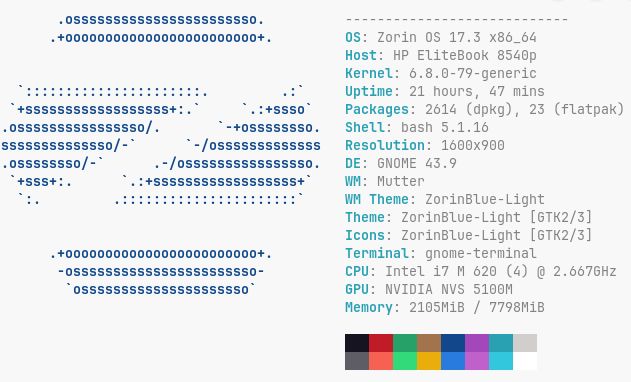 As you can see from this image, nothing too fancy. Intel i7 M620 cpu, running at 2.667 GHz with 8 GB of Ram and Nvidia NVS 5100M graphics. (Double click to zoom.)
Now, a few things about Zorin:
1. It is based on Ubuntu LTS (Long Term Support) Linux. Meaning, that new major versions only get released every two or three years. After a new major version gets released, the previous version will still get updates for a couple years, giving you that period of time to update (FREE) to the new version.
2. For those Windows folks that feel the need to pay, you can download the Pro version for just under $50 that includes tech support. It basically just has more apps and things installed out of the box, but you can use the software store to install anything you wish. (So, I think the free version is the way to go, but I have been using Linux, since 1994 and Unix since the mid eighties, so I have absolutely NO use for tech support. There are also more than enough youtube videos, that a simple google search should turn up enough tech support for most problems.)
3. You just download whichever ISO image that you want, and use a tool like Rufus to burn it to a bootable USB key. Then, you just insert the USB key in your computer, access the boot menu, boot the computer from the USB key, and follow the prompts to install Zorin. Here is the link to download Zorin: https://zorin.com/os/download/ and here is the link to download Rufus: https://rufus.ie/en/.
4. Even though the default Zorin browser is now Brave, you can still install Firefox or Chrome, to name a couple, if you wish. Firefox is right in the software store, and with Chrome, you just download the linux version from the main Chrome download page and then install it.
Here are the system requirements for Zorin OS, so you can see they aren’t too high:
CPU: 1 GHz Dual Core – Intel/AMD 64-bit processor
RAM: 2 GB
Storage: 15 GB (Core), 32 GB (Education), or 40 GB (Pro)
Display: 1024 × 768 resolution
It only needs 2GB, and I tested it with 4GB, and it ran just fine. When I ran it with 8GB, it was even a little bit better.
One thing you might need to know, if your computer has an NVIDIA graphics card or chip, the Zorin default windows manager (Wayland), doesn’t support NVIDIA as well as the X11 window manager (Xorg). No big deal, because while you are installing Zorin, there is an NVIDIA choice, so just select that. When you log in for the first time, click on your name, and before you enter your password, in the lower right of the screen, click the gear icon and make sure XOrg is selected, and if not, then select it and then log in.
Now, a few words about post-installation:
It is rather lightweight, allowing those low requirements above. You can see from this screenshot, I downloaded a winamp installer in the upper right. The other three icons to the right of that are Windows portable apps. This is made possible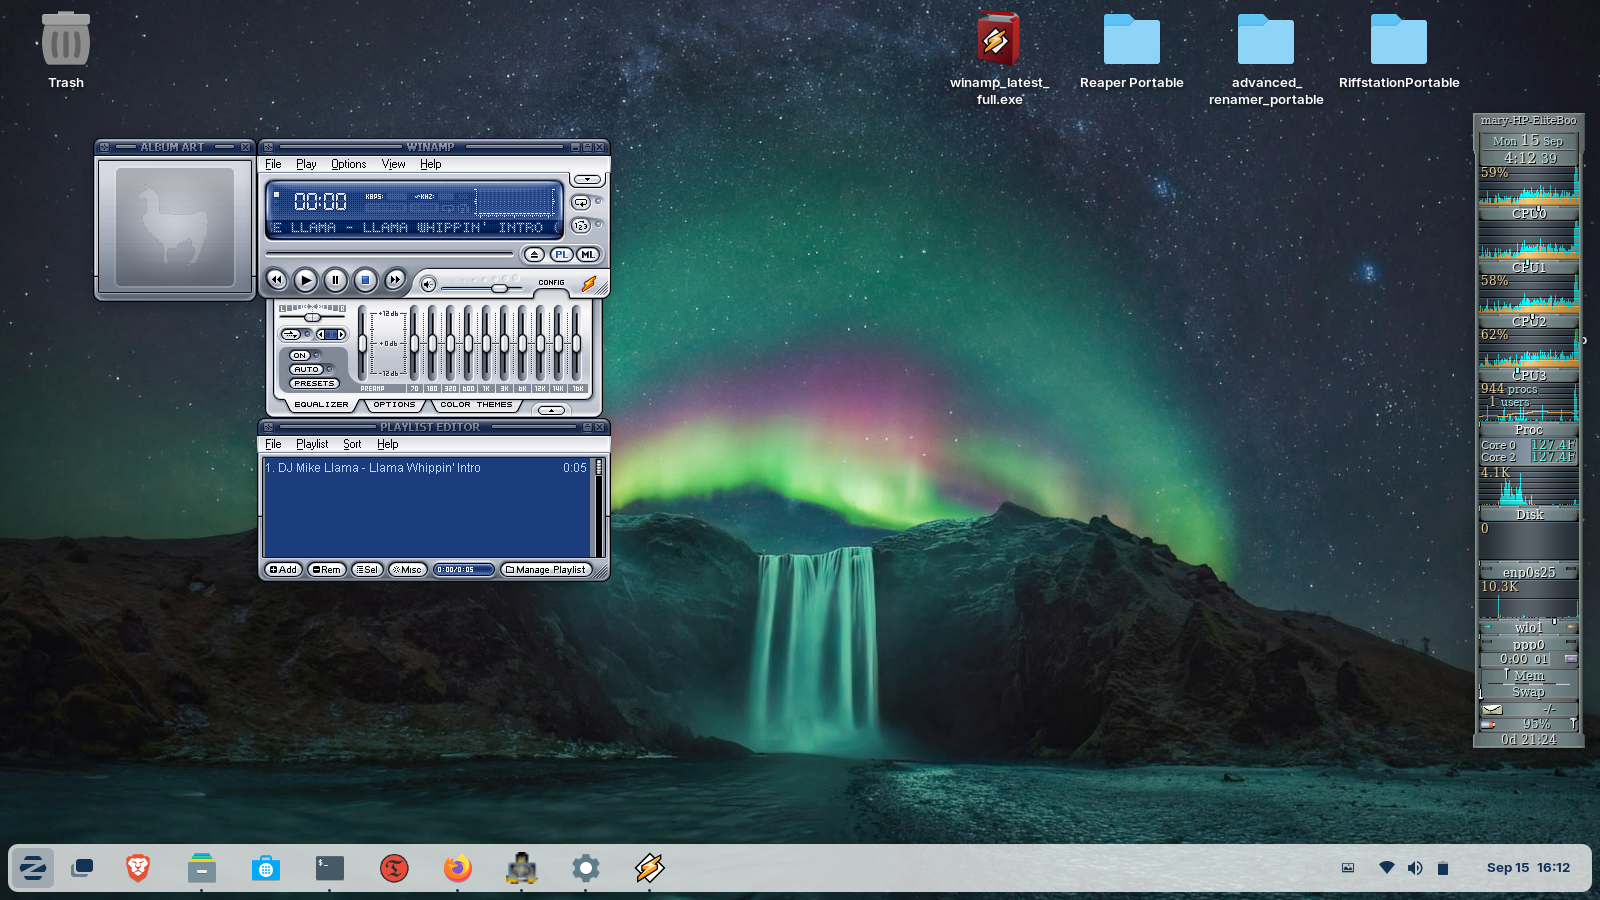 by the Windows Compatibility Layer (Wine) and Bottles. You can also see from this screenshot, that I used that Winamp installer, and here is Winamp running happily on Zorin.
I won’t say that it will run every Windows app, but I have installed many different things under wine, like Sony Soundforge. There are also many things that you won’t need to install. No need for MSOffice, as Libre Office is already installed. Libre handles all the MS formats, such as .doc, .xls, etc, etc. So, it will read and write all of the MSOffice document types.
Here is a link to help you along with 20 things you should do after installing Zorin: https://www.youtube.com/watch?v=VuESAFgsOvg&t=1158s . It shows you how to use the terminal to install stuff, which you may not want to be bothered with, so keep in mind that you can just use the software store to search for and install the packages. I am very proficient with Linux, so I prefer to use the Terminal for my installation needs.
At the bottom of the screen, you probably noticed a very windows-like taskbar, that I set to autohide. At the very left of the taskbar is the big Z, which is just like windows start button. In the top left I placed the trashcan, which behaves just like windows. I also installed things like variety (that auto changes my wall paper every so often) and preload (which caches apps that you use frequently, so they load much faster).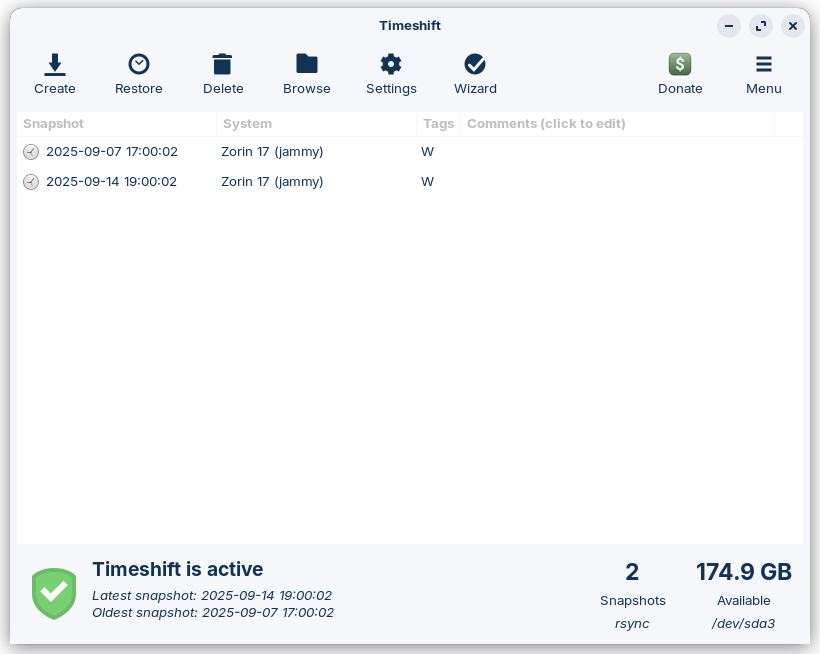
I also installed Timeshift, which uses rsync to set up system snapshots, as you can see in this screenshot. It is basically just like Windows Restore points.
Here is a Zorin OS 17.3 overview, for some more info: https://www.youtube.com/watch?v=5XMhYQ2vMzA
So, in closing, Zorin OS 17 is a great alternative to either tossing your laptop into a landfill, or upgrading your PC either by upgrade or purchase. OR, you could just be ready to join the growing number of people that are fed up with Bill Gates and Microsoft. (BTW: this blog post was made using Firefox under Zorin OS 17.3.) Also, anyone that knows how to get hold of me can feel free to ask me any tech support questions that you may have. 😉
Category Archives: Computer
Xenon 4.0 Released
Xenon 4.0 was released a couple days ago. I’ve installed it on an android tablet and android box with no issues encountered so far. As always, the setup skin requires a bit of patience. Fen Light is installed by default, and if you don’t use it, try it. You just may like it. I have it set to not auto play, but to let me accept the source. I also set it to preload the next episode, and that really saves time when binge watching a season. If you watch sports, you will want to add The Loop and Mad Titan. As always, don’t forget to authorize your Trakt. Same for your Real-Debrid, it that’s what you use. Additionally, you could install the Elementum and Elementum Burst addons. But, I will caution you to always run Xenon behind a VPN. You have been warned!! I will also suggest that you backup your build in case anything goes wrong down the line. You do that under Omega Wizard>Maintenance>Backup Build. I always name mine backup, so the next one just over writes the last one so they don’t pile up. 😉 Takes 10 or 15 minutes to backup, so go have an adult beverage. Another notable thing to mention is the IVue TV Guide is gone as it was pretty difficult to configure, and most people struggle with time zone setting. Use instead TV Guide (PVR) from the small menu on the TV Guide tab. All in all, this is a pretty nice and stable update, worth the time to install it.
How to install VPN on a router
I was talking with a former colleague of mine a week or so ago that I worked with for 21 years. Since we are both Engineers, many times, our discussions contain tech ramblings of one sort or another. This time, we chatted a little bit about routers and putting a VPN on them to protect multiple devices at a time.
The VPN currently in the #1 spot, is NordVPN. (For many reasons, including a no logs policy.) I also remembered that a few of my friends actually had to get Nord’s assistance to get it all set up on their router. Usually, that ability resides with the more expensive routers, and usually not allowed on things like the Arris routers that you get from your cable or fiber ISP.
But, there is another, cheaper alternative, as long as you have a supported router. This is one reason that I’m fairly partial to Linksys (Cisco) routers, ever since my first 4 port wired router, and my first 4 port wiress router. I have WRT54G, WRT54GL, WRT1200ac, and WRT1900ac routers. I flash them with the DD-WRT firmware. DD-WRT unlocks a lot of features, making 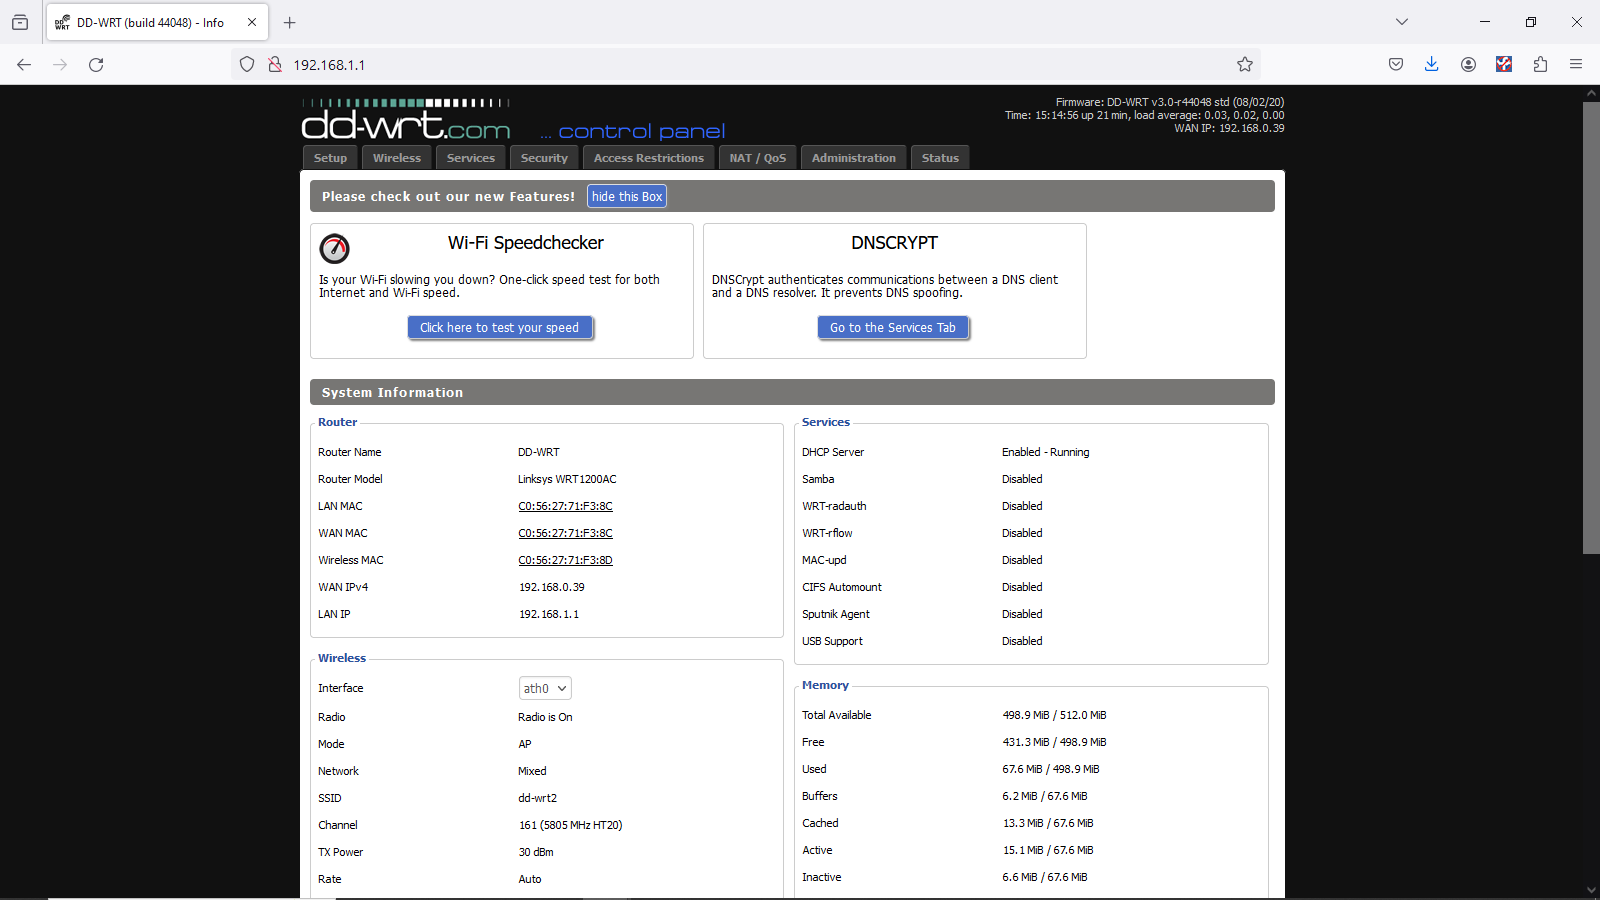 a somewhat cheap router perform like one that is much more expensive. (Sometimes $500 – $600 or more.) I think at one time, I was buying WRT54GL routers new on amazon for 50 bucks. But the 1200 and 1900 routers were selling for $200 and $300 respectively. Good news is that you can find them each on ebay for around 40 bucks now. 😉 (BTW: you can click a couple times on the supplied graphics to help you see better.)
This post won’t go over flashing (maybe later) your router, as you can get help on that from dd-wrt, or youtube. Once you have flashed your router, the interface is fairly similar, no matter which router you have.
In order to get NordVPN on dd-wrt, the first thing to do is to go to Setup>Basic Setup in the interface. Under Network Address Server Settings (DHCP), set the following: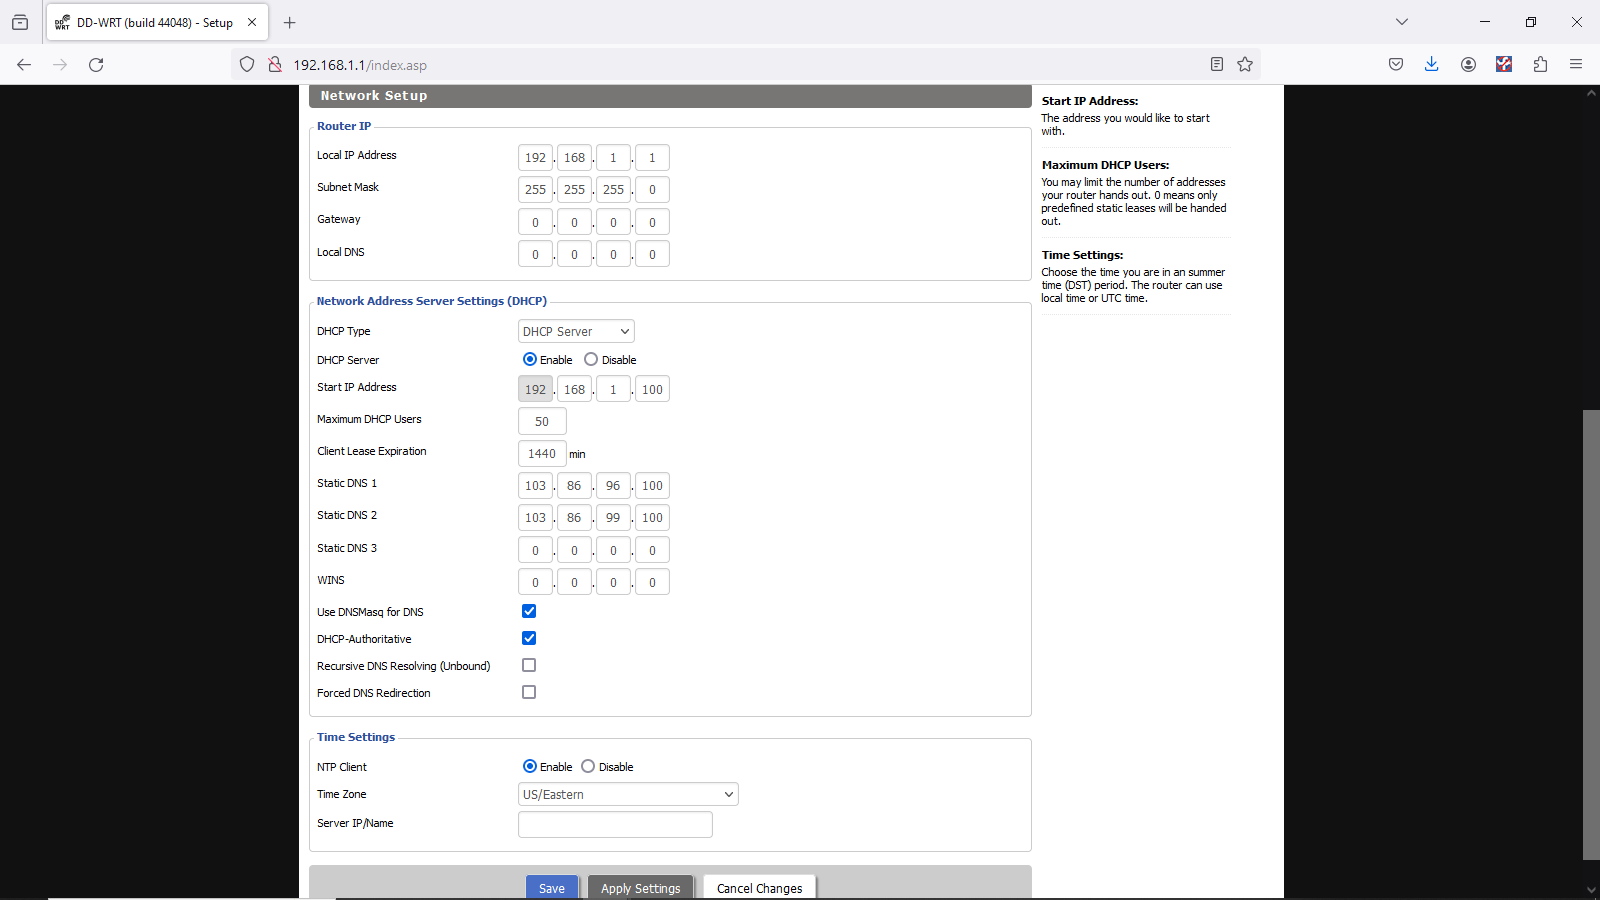
Static DNS 1: 103.86.96.100
Static DNS 2: 103.86.99.100
Static DNS 3: 0.0.0.0 (default)
Use DNSMasq for DHCP: Checked (If you have this)
Use DNSMasq for DNS: Checked
DHCP-Authoritative: Checked Then, Save and Apply
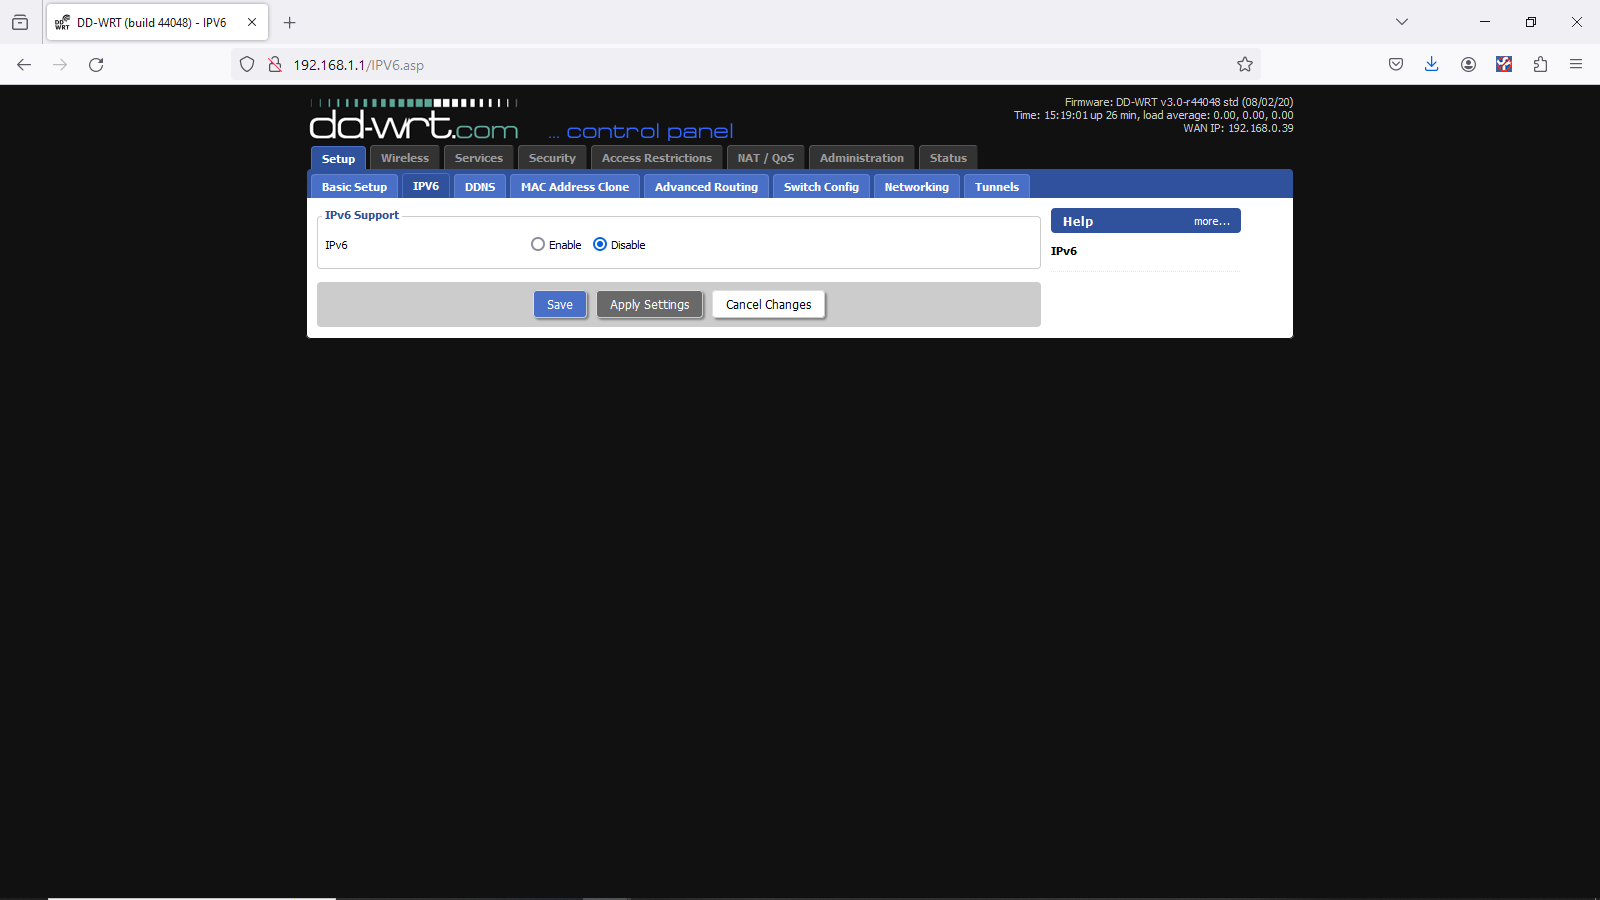 Next, head over to Setup>IPV6 and make sure it’s disabled. If you have this enabled, your actual IP address can potentially leak out and defeat the advantage of using a VPN.
Next, you’ll want to go to Services>VPN. Under OpenVPN Client, set Start OpenVPN Client to Enable, and you will then see the configuration options. You will need to set the Server IP/Name. If using Nord, you can go to https://nordvpn.com/servers/tools/ to get a suggestion as to the best server. Then, click on show available protocols, and download the UDP or TCP config file. (I use the UDP on my routers.) You will need this file in a little bit. You will want to also set the following values:
Port: 1194 (or 443 for the TCP protocol)
Tunnel Device: TUN
Tunnel Protocol: UDP (or TCP)
Encryption Cipher: AES-256-CBC
Hash Algorithm: SHA-512
User Pass Authentication: Enable
Username, Password: Your NordVPN service credentials
(The encrypted versions) You get these from logging into Nord, then going to: https://my.nordaccount.com/dashboard/nordvpn/ Then, 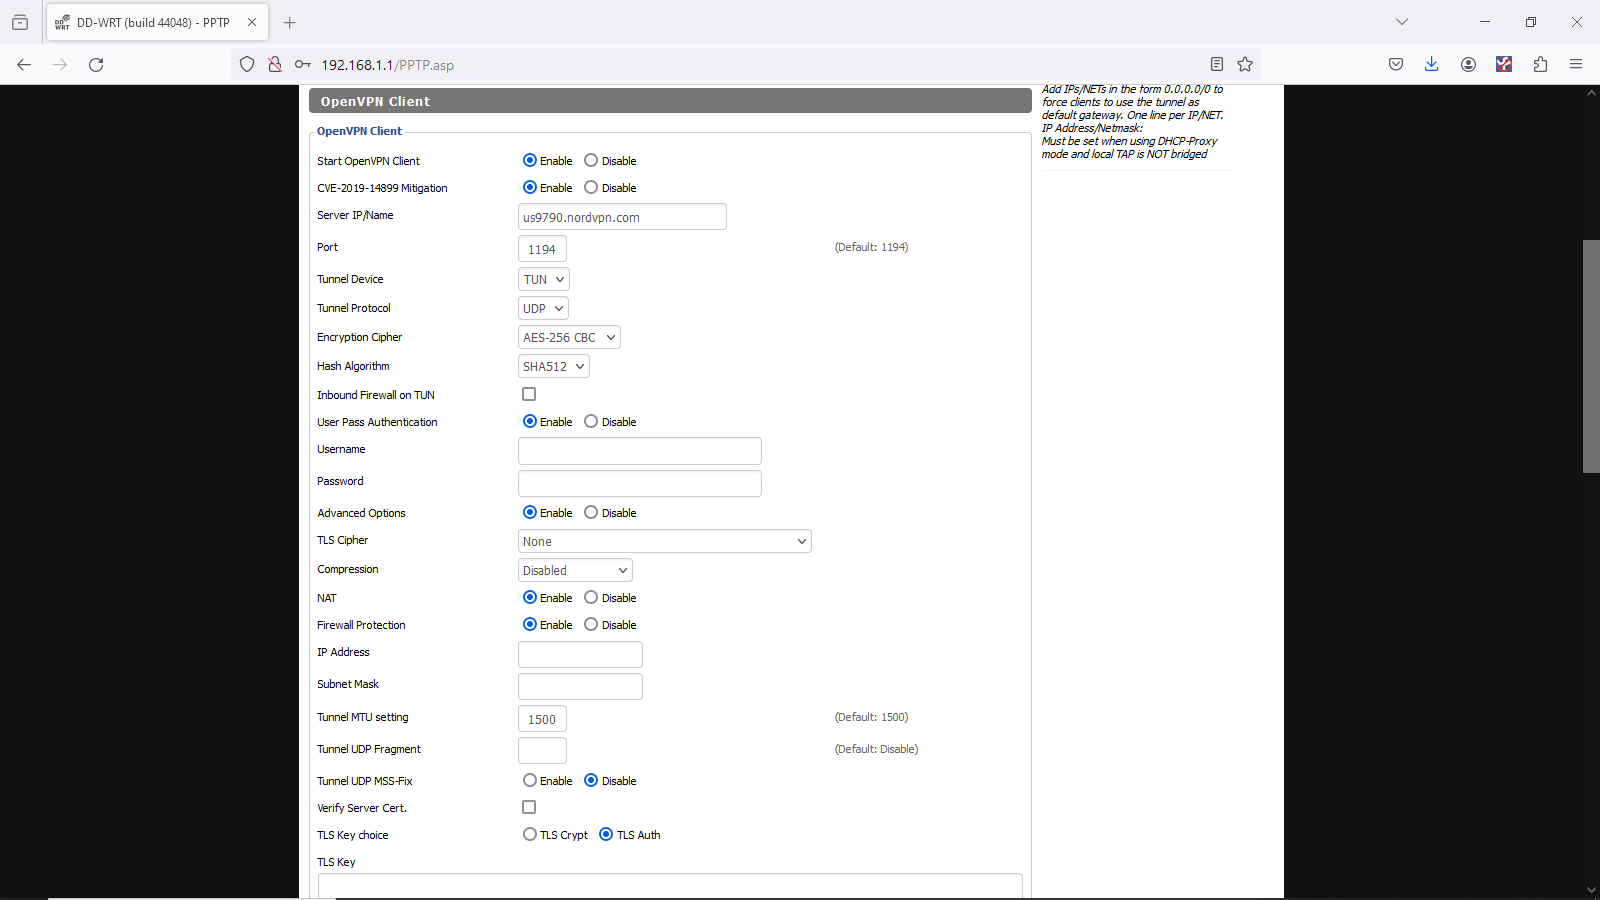 go to the bottom and click on Set up NordVPN Manually. It is there that you will find the encrypted user name and password. You will want to copy/paste them into the appropriate blocks on DD-WRT. Set Advanced Options to Enable to allow you to set the following:
TLS Cipher: None
LZO Compression: Disable
NAT: Enable
In the Additional Config box, put these commands:
remote-cert-tls server
remote-random
nobind
tun-mtu 1500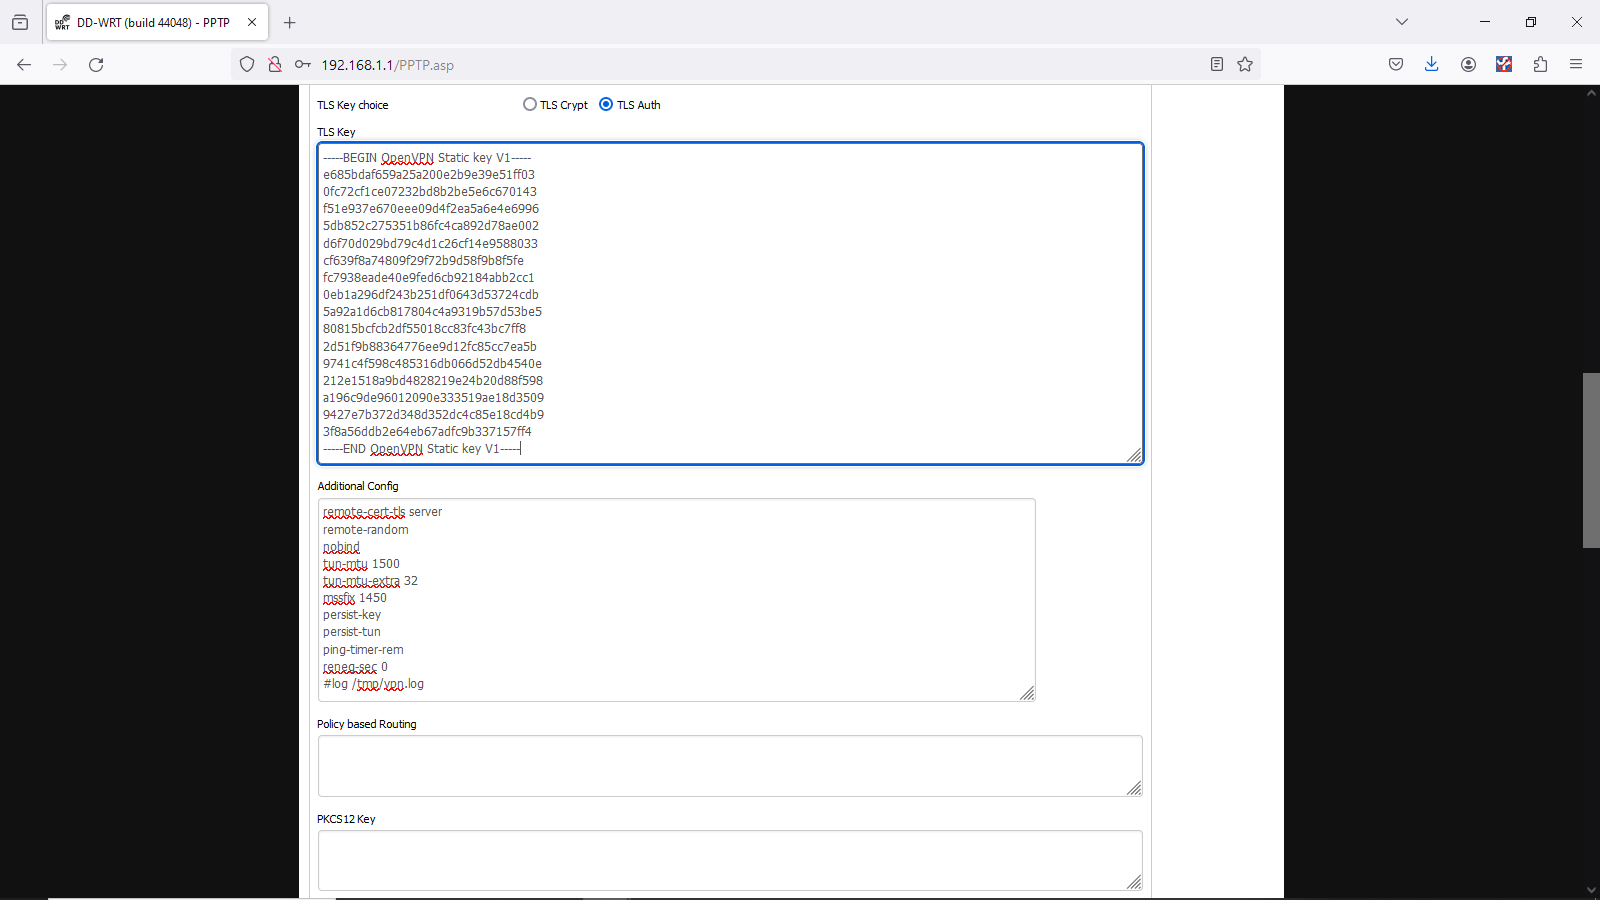
tun-mtu-extra 32
mssfix 1450
persist-key
persist-tun
ping-timer-rem
reneg-sec 0
#log /tmp/vpn.log
Then, open the UDP (or TCP) config file that you downloaded into a text editor. Look for the section that has these two lines:
—– Begin OpenVPN Static Key V1—–
—–End OpenVPN Static Key V1—–
You will need to copy/paste everything in between those two lines, as well as both of the above lines into the block TLS Key, as in the above pic. Then, you will need to find the section that has:
—–Begin Certificate—– and—–End Certificate—–
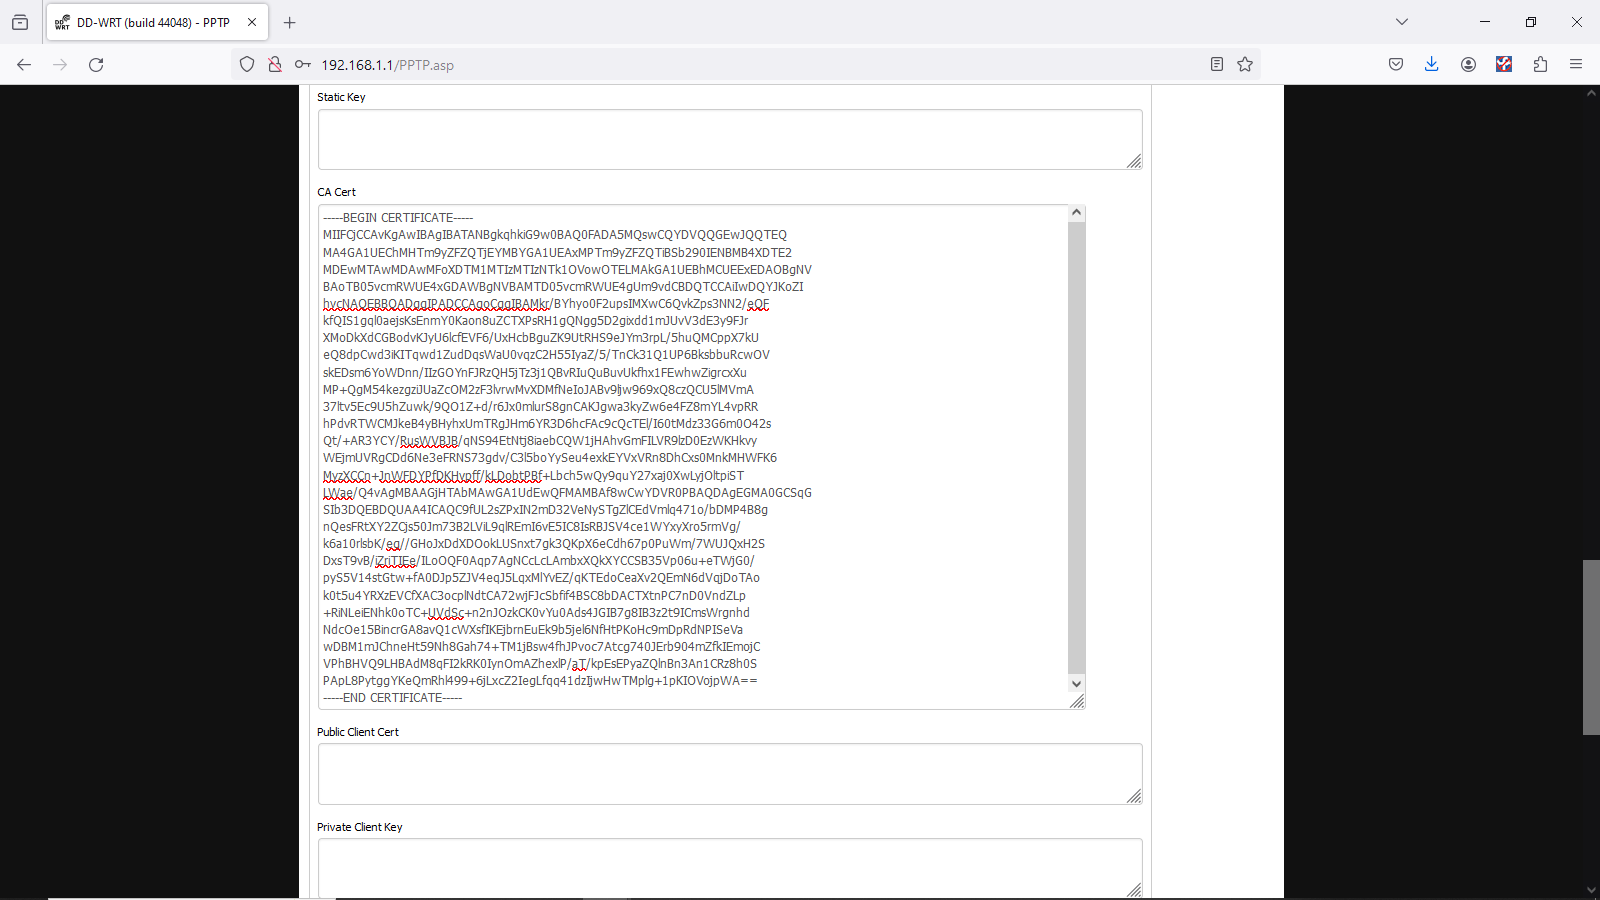 Copy/Paste everything in between those two lines, as well as those to lines into the CA Cert block as in the graphic to the left. After all that is entered, you need to click Save, then Apply Settings. To verify that the VPN is working, navigate to Status > OpenVPN. Under State, you should see the message “Client: CONNECTED SUCCESS“.
Now, everything that connects to that router, either by wire or wirelessly will be protected under NordVPN. 😉
Security images pruning
Well, I have been procrastinating about this.  My security videos get saved on the linux security server, and are limited to a month or so. Daily, those sql event images get combined into an .avi video and saved locally and sent via ftp to my main server. They DO pile up, though, as evidenced by the image on the right. 1.2TB. They have been saving since 12 Apr 2018, when I added that feature to the script that I wrote that created the video files from the sql images. The reason I did that was that it made it easier to review and archive the security alerts. Hand deleting all those directories would be a major pain in the ass. Enter this command: 😉
[root@cap Cameras]# find -mtime +365 -exec rm -R {} \;
It took a short while to parse through all the directories, but, eventually it finished. I checked on things with du -h –max-depth=0. The max-depth argument will stop all the sub directories from printing to the screen. The results are  in the image below. 436GB. That’s quite a bit of space saved. Now, instead of directory saved images dating back to 2018, there is only one year. While the find/rm command above is suitable to enter directly into a terminal and have it operate on the current directory, it is rather dangerous to use. Far better to schedule a potentially dangerous command in the cron. First step, is to create the command. In order to do that, as root do: nano /sbin/shear , or the name you choose to use. I chose shear. Add this & save: find $1 -mtime +365 -exec rm -R {} \; If you have sharp eyesight, you will notice that I inserted $1 after find. This is a command variable. Last part of creating the command will be to make it executable by root, and not even readable by other users. Do this as root to do that; chmod 700 /sbin/shear. Of course, if you can’t use root directly on your system, then use sudo. Now, you can directly use the command that you created as:
# shear /path/to/directory/you/wish/. (/sbin/ should be in your path. If you saved it elsewhere not in your path, </path/shear>) 😉
Final step is to create a crontab entry to run it monthly or so. crontab -e will allow you to edit your crontab, Of course, you might have to do sudo crontab -e if you can’t become root. If you need help with the syntax: cat /etc/crontab. I also have the MAIL=root commented out, so as not to get emails filling up root’s email box. Then, restart crond. That’s it. If anybody needs a review of crontab and how to use systemctl to restart crond, either reach out to me, or just add a comment, and I’ll create a little tutorial. 😉